


Logo Creator – Smooth Editing Directly in the Webshop!

Written by
Karin Goffe
Tips & Tricks
How Logo Creator Works
Logo Creator is a smart feature in our webshop that makes it easy to adjust and edit your design before placing your order.
With our intuitive tool, you don’t need any external programs – everything you need is gathered in one place. Whether you want to customize colors, adjust sizes, or fine-tune details, Logo Creator makes the process quick and smooth.
Below, we walk you through 4 sections covering the different functions and how to use them to create perfect originals for your heat transfers.
The Three Best Features in Logo Creator:
-
Free & fast vectorization – We vectorize your design instantly and at no extra cost.
-
Edit design – Duplicate, crop, resize, change colors & quality.
-
Add outline & text – Add an outline around your design to increase visibility. Add or remove text, and choose from different fonts, colors, and placements.
Prepare Your File
–watch the video below or read about the first 5 steps!
1. Upload file
Choose how you want to upload your design:
- A file in one of the following formats: PDF, AI, EPS, PNG or JPG
- Create a text logo directly in the tool
- Upload a multi-/sponsor logo
- Create a variant of an existing item in your item library
2. Customize your design & choose print method
Select print method – Solid or Process (you can also adjust this later if needed). You can also remove any background directly in this step. Change the grid background color to see your design more clearly.
3. Vectorization
If your file is not in vector format, we can vectorize it for free! You’ll see both the original and the vectorized result side by side for easy comparison. To continue, you need to approve the vectorization quality.
Not satisfied with the result? You can choose manual redrawing for an extra cost of SEK 500. This takes about 1–2 working days to complete.
Watch a video on how vectorization works!
4. ColorsHere, you select the unique Pantone colors you want to use. Logo Creator identifies existing Pantone colors in the file and suggests the best match if they’re missing. You can also refine your design by removing specific colors. For example, deleting white will remove any white text in the design.
- Solid method allows up to 7 unique colors.
- For more colors, switch to Process.
5. Transfer quality
We offer three main products – STARK, FLEX, and REFLEX. Choose the right heat transfer for your needs. Name your design so you can easily find it in your item library later.
Edit Your File
– watch the video below or read the guide.
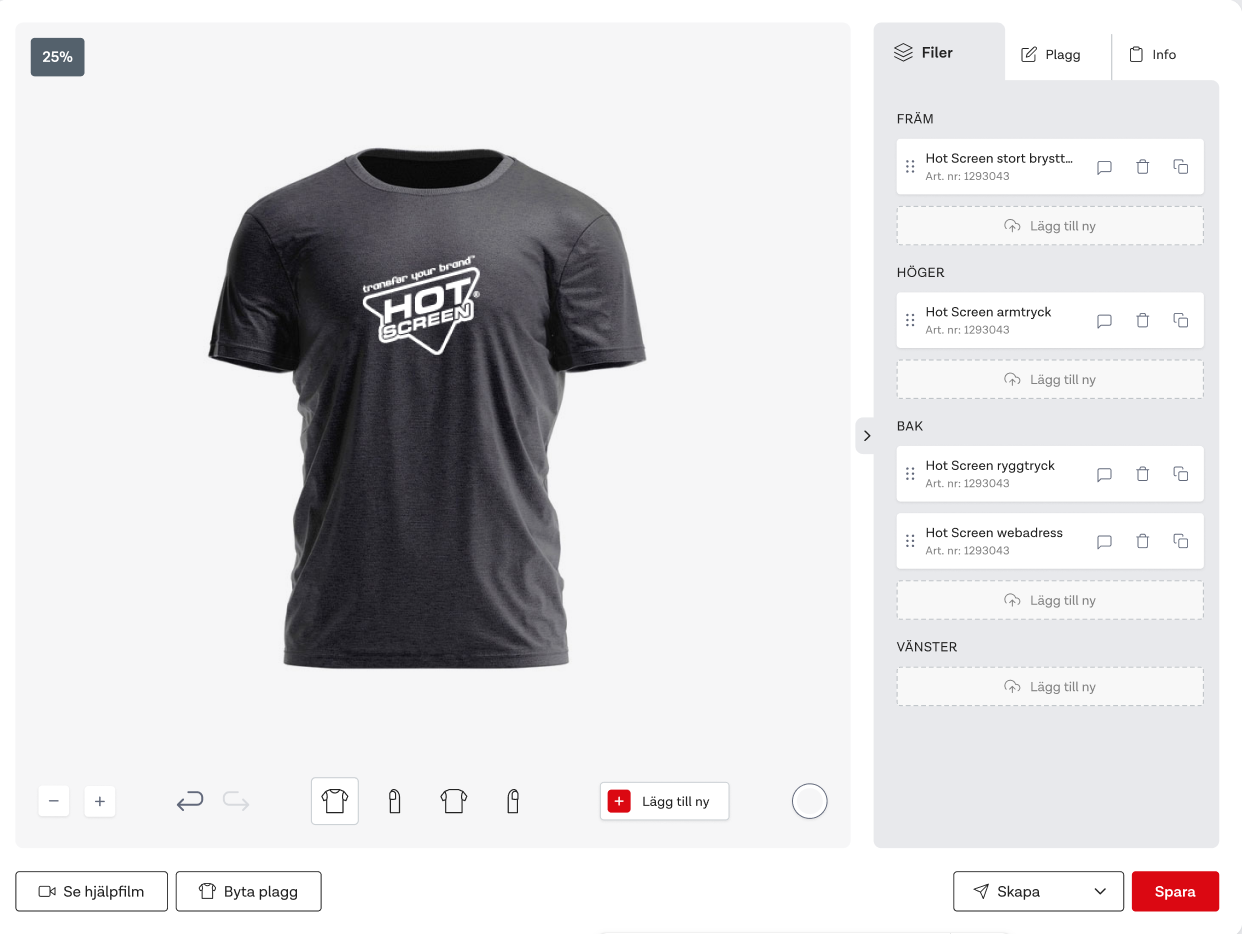
6. Files
In the canvas, you’ll see the files you’ve uploaded for the current project. You can duplicate, delete, or upload additional files as needed.
7. Edit
Now it’s time to edit your design. Here you can make most of the necessary adjustments: change colors and quality, crop, and add details like outline and text. Rename your design and save it as a multilogo for multiple uses.
Three smart edit features:
-
Add comment – Write a note in your file to highlight details or provide important info to your customer.
-
Change grid background color – Match the background to the intended garment or create better contrast.
-
Resize easily – Drag your design and see updated dimensions instantly under the logo, or enter a specific size.
Item
– watch the video below or read the guide.
8. Item
In the canvas, you’ll see your uploaded files for the current project. You can duplicate, delete, or upload more files as needed.
Item summary
Here you’ll get an overview of your order and product details in Logo Creator: article number, colors, size, and pricing. Add extras like Blocker. Adjust quantities, save changes, and keep track of VAT and total amount – simple and clear.
Note! Categorize your items here to build a smooth and well-organized item library for your customers.
Create Proofs, Create Items, Order!
– watch the video below or read the guide.
9. Create proof
Generate a proof. Name it and decide if the price should be visible to your end customer. If you choose to show the price, you can add a percentage markup to display your customer’s price instead of your own.
You can also brand your proof with your own logo so the customer instantly recognizes you as the supplier.
Read more about how proofs work
10. Create items
When you click “Create Items,” you’ll get a clear overview of your designs and all related technical details. By clicking “Save,” your items will appear under the “My Items” tab and can easily be ordered when you’re ready.


